When it comes to maintaining your Oster blender, knowing how to replace worn-out parts can significantly enhance its performance. This article explores the specifics of the Oster Blender Replacement Parts, covering everything from features to installation tips. Join me as we dive deeper into what makes this replacement kit an essential accessory for blending enthusiasts.
Product Features
| Feature | Description |
|---|---|
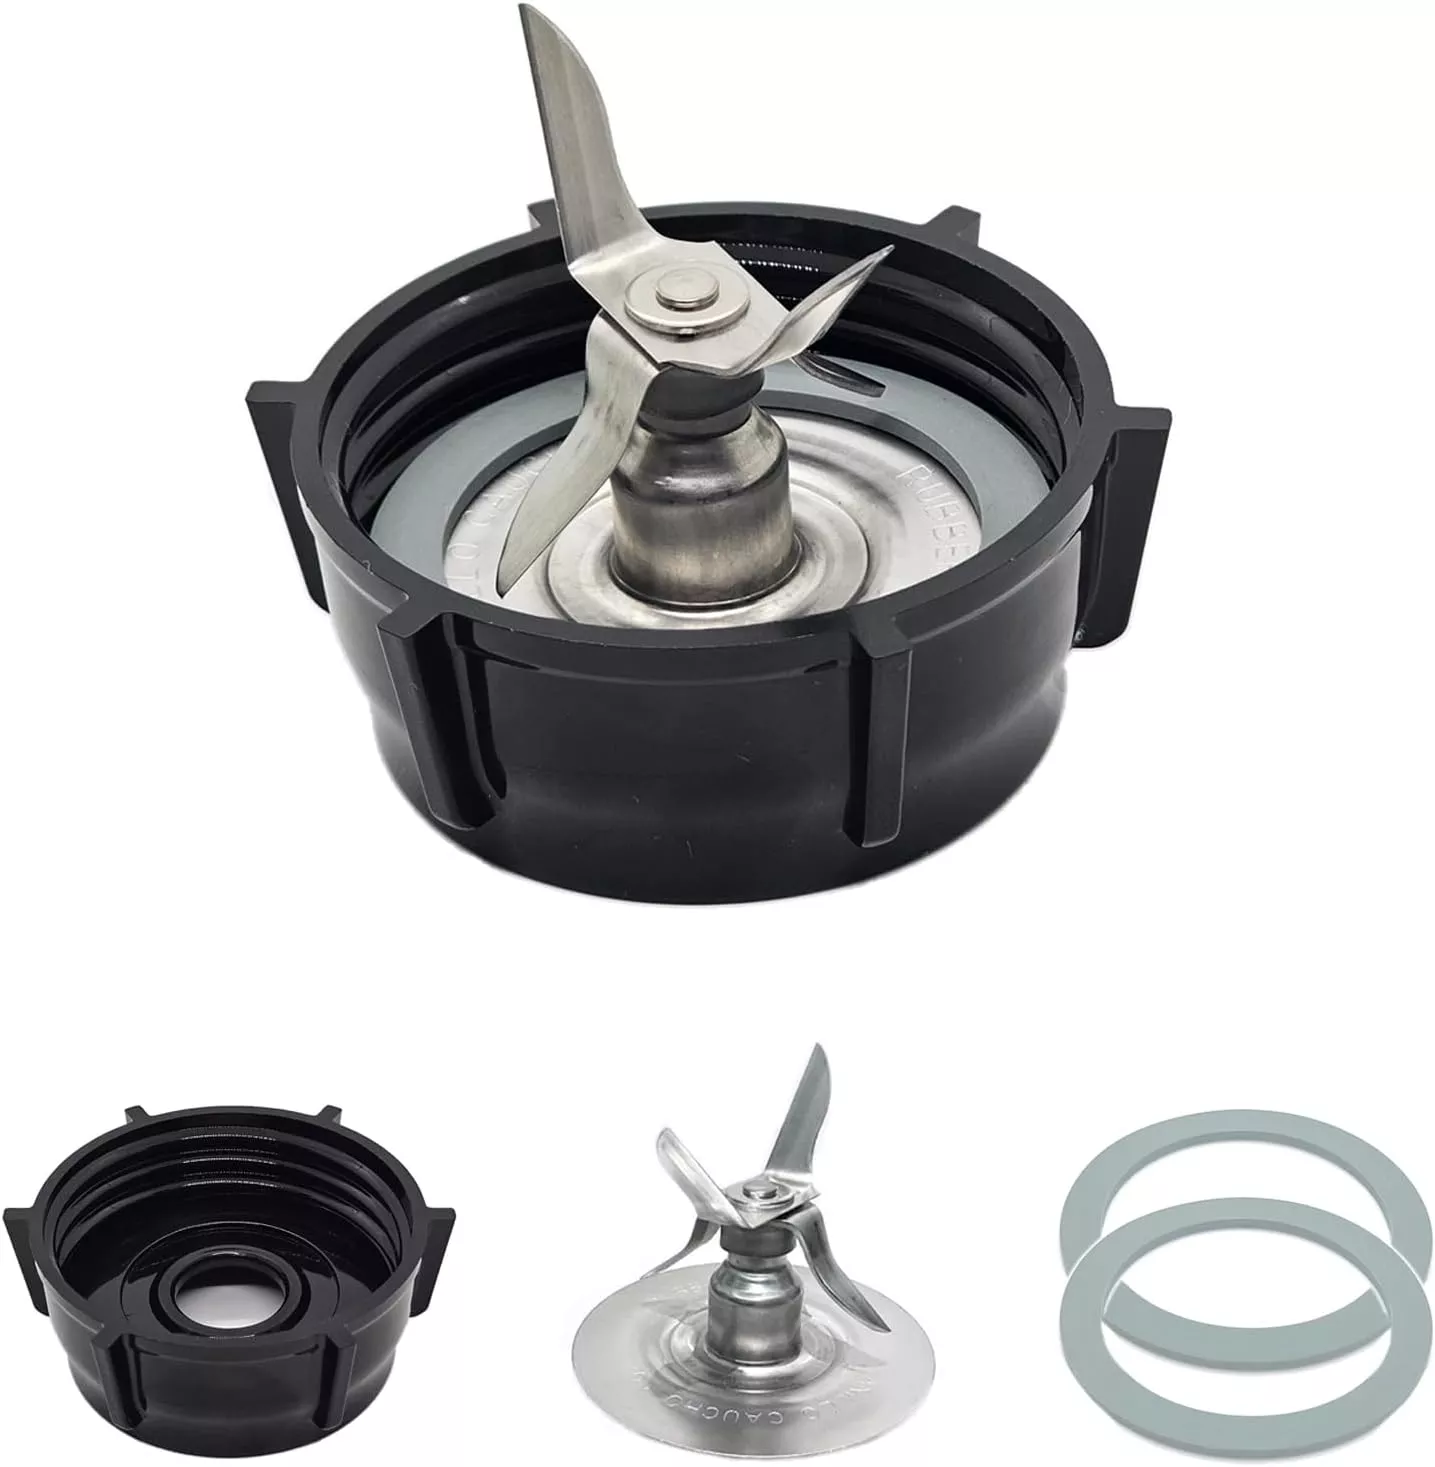
| Package Included | 1Pcs 4-point blade + 1Pcs blender jar base + 2Pcs seal gasket |
| Compatibility | Fits models with an outside diameter of the base of the blade is 2 3/4″ (Does NOT fit Pro, Master, or Versa models) |
| Replacement Kit | Base cup fits most Oster blender jars, perfect for smoothies and other blender foods |
| Materials | Hard plastic gear, stainless steel speed blade, rubber gasket |
| Tips | Non-original aftermarket parts; contact us if not completely satisfied |
Product Overview
| Pros | Cons |
|---|---|
| High compatibility with standard Oster models | Does not fit Pro, Master, or Versa models |
| Affordable replacement solution | Aftermarket quality may vary |
| Easy installation for quick repairs | Non-original parts might not meet original specs |
Understanding the Importance of Replacement Parts
Understanding the importance of replacement parts for your Oster blender cannot be underestimated. Just like any appliance, the longevity and performance of your blender are significantly affected by its components. When I notice common signs such as unusual noises, leaking jars, or difficulty in blending even the softest ingredients, I understand it’s time to consider replacement parts. These warning signs are not just inconveniences; they can drastically impact the blending performance, leading to subpar results in your culinary creations.
Using aftermarket parts like the Oster Blender Replacement Parts Kit is often a cost-effective solution. Not only do they offer compatibility with various Oster models, but they can also restore your blender to its peak performance without breaking the bank. However, it’s crucial to ensure that the parts you choose are compatible with your specific blender model. Compatibility issues can result in poor performance or even cause damage to your blender. Imagine investing in new parts that don’t fit properly! This could lead to frustration and more costs down the line.
In summary, recognizing the signs for replacement and ensuring that your parts are compatible will not only enhance your blending experience but also prolong the life of your Oster blender. You want to keep blending smoothly and efficiently, giving you great results every time.
How to Install Your Replacement Parts
Installing replacement parts in your Oster blender can seem intimidating, but with the right guidance, it can be a straightforward process. I’ll walk you through replacing the blade and jar base step-by-step.
First, make sure you have the necessary tools on hand: a soft cloth, a screwdriver (if applicable), and possibly pliers if your parts are difficult to remove. Start by unplugging your blender for safety. Remove the jar from the base by twisting counterclockwise. Set it on a soft surface to prevent scratches.
To replace the blade, carefully unscrew the blade assembly from the bottom of the jar using a screwdriver. If it’s stuck, a bit of gentle pressure from the pliers may help. Once removed, replace it with the new blade, ensuring it’s aligned properly before tightening it securely. Make sure to wipe down any residue from the jar and the base with a clean cloth before reassembly.
For the jar base, simply snap the new base onto the bottom of the jar until you hear a click. It’s essential to ensure it fits snugly; otherwise, you may experience leakage during blending.
If you encounter difficulty during installation, double-check the alignment of your parts. Misalignment is a common issue. After you’ve completed the installation, test the blender with water first to ensure everything is functioning correctly before preparing your favorite smoothies or sauces.
Conclusions
In conclusion, the Oster Blender Replacement Parts kit stands out as an effective and affordable option for anyone looking to revitalize their blender. With easy installation and high compatibility, it simplifies maintenance while ensuring your blender performs at its best for delicious smoothies and more.